Hi all. I am trying to do something in OmniOutliner that it may not be really suited to but please bear with me.
As part of a fire investigation process I need to cull a folder full of JPEG images, make some of the image metadata available as a text field, note the image direction, add brief notes and mark whether or not the image has been uploaded for inclusion in the final report.
I have the images in a single folder with each being appropriately named as well as a spreadsheet showing the camera image metadata, direction and a very limited comment.
I have been able to drag the images into a new OmniOutliner document with an appropriate column structure. Doing this allows me to change how the image appears using “show as icon” or “show as image” from the contextual menu.
I cannot find any way to import the spreadsheet data that does not try to lump it into a single row but I am convinced [probably in error] that this should be possible. I can manually copy each cell but that gets old and error prone very quickly.
Hoping that someone can point me in the right direction!
I even tried to set up a keyboard shortcut to apply the context menu “show as” switch but even this has evaded me using either Keyboard Maestro or KeyCue; I don’t know if my brain can handle this any more.
Cheers, tlb
Can you share a screenshot of your OmniOutliner file and your desired outcome ?
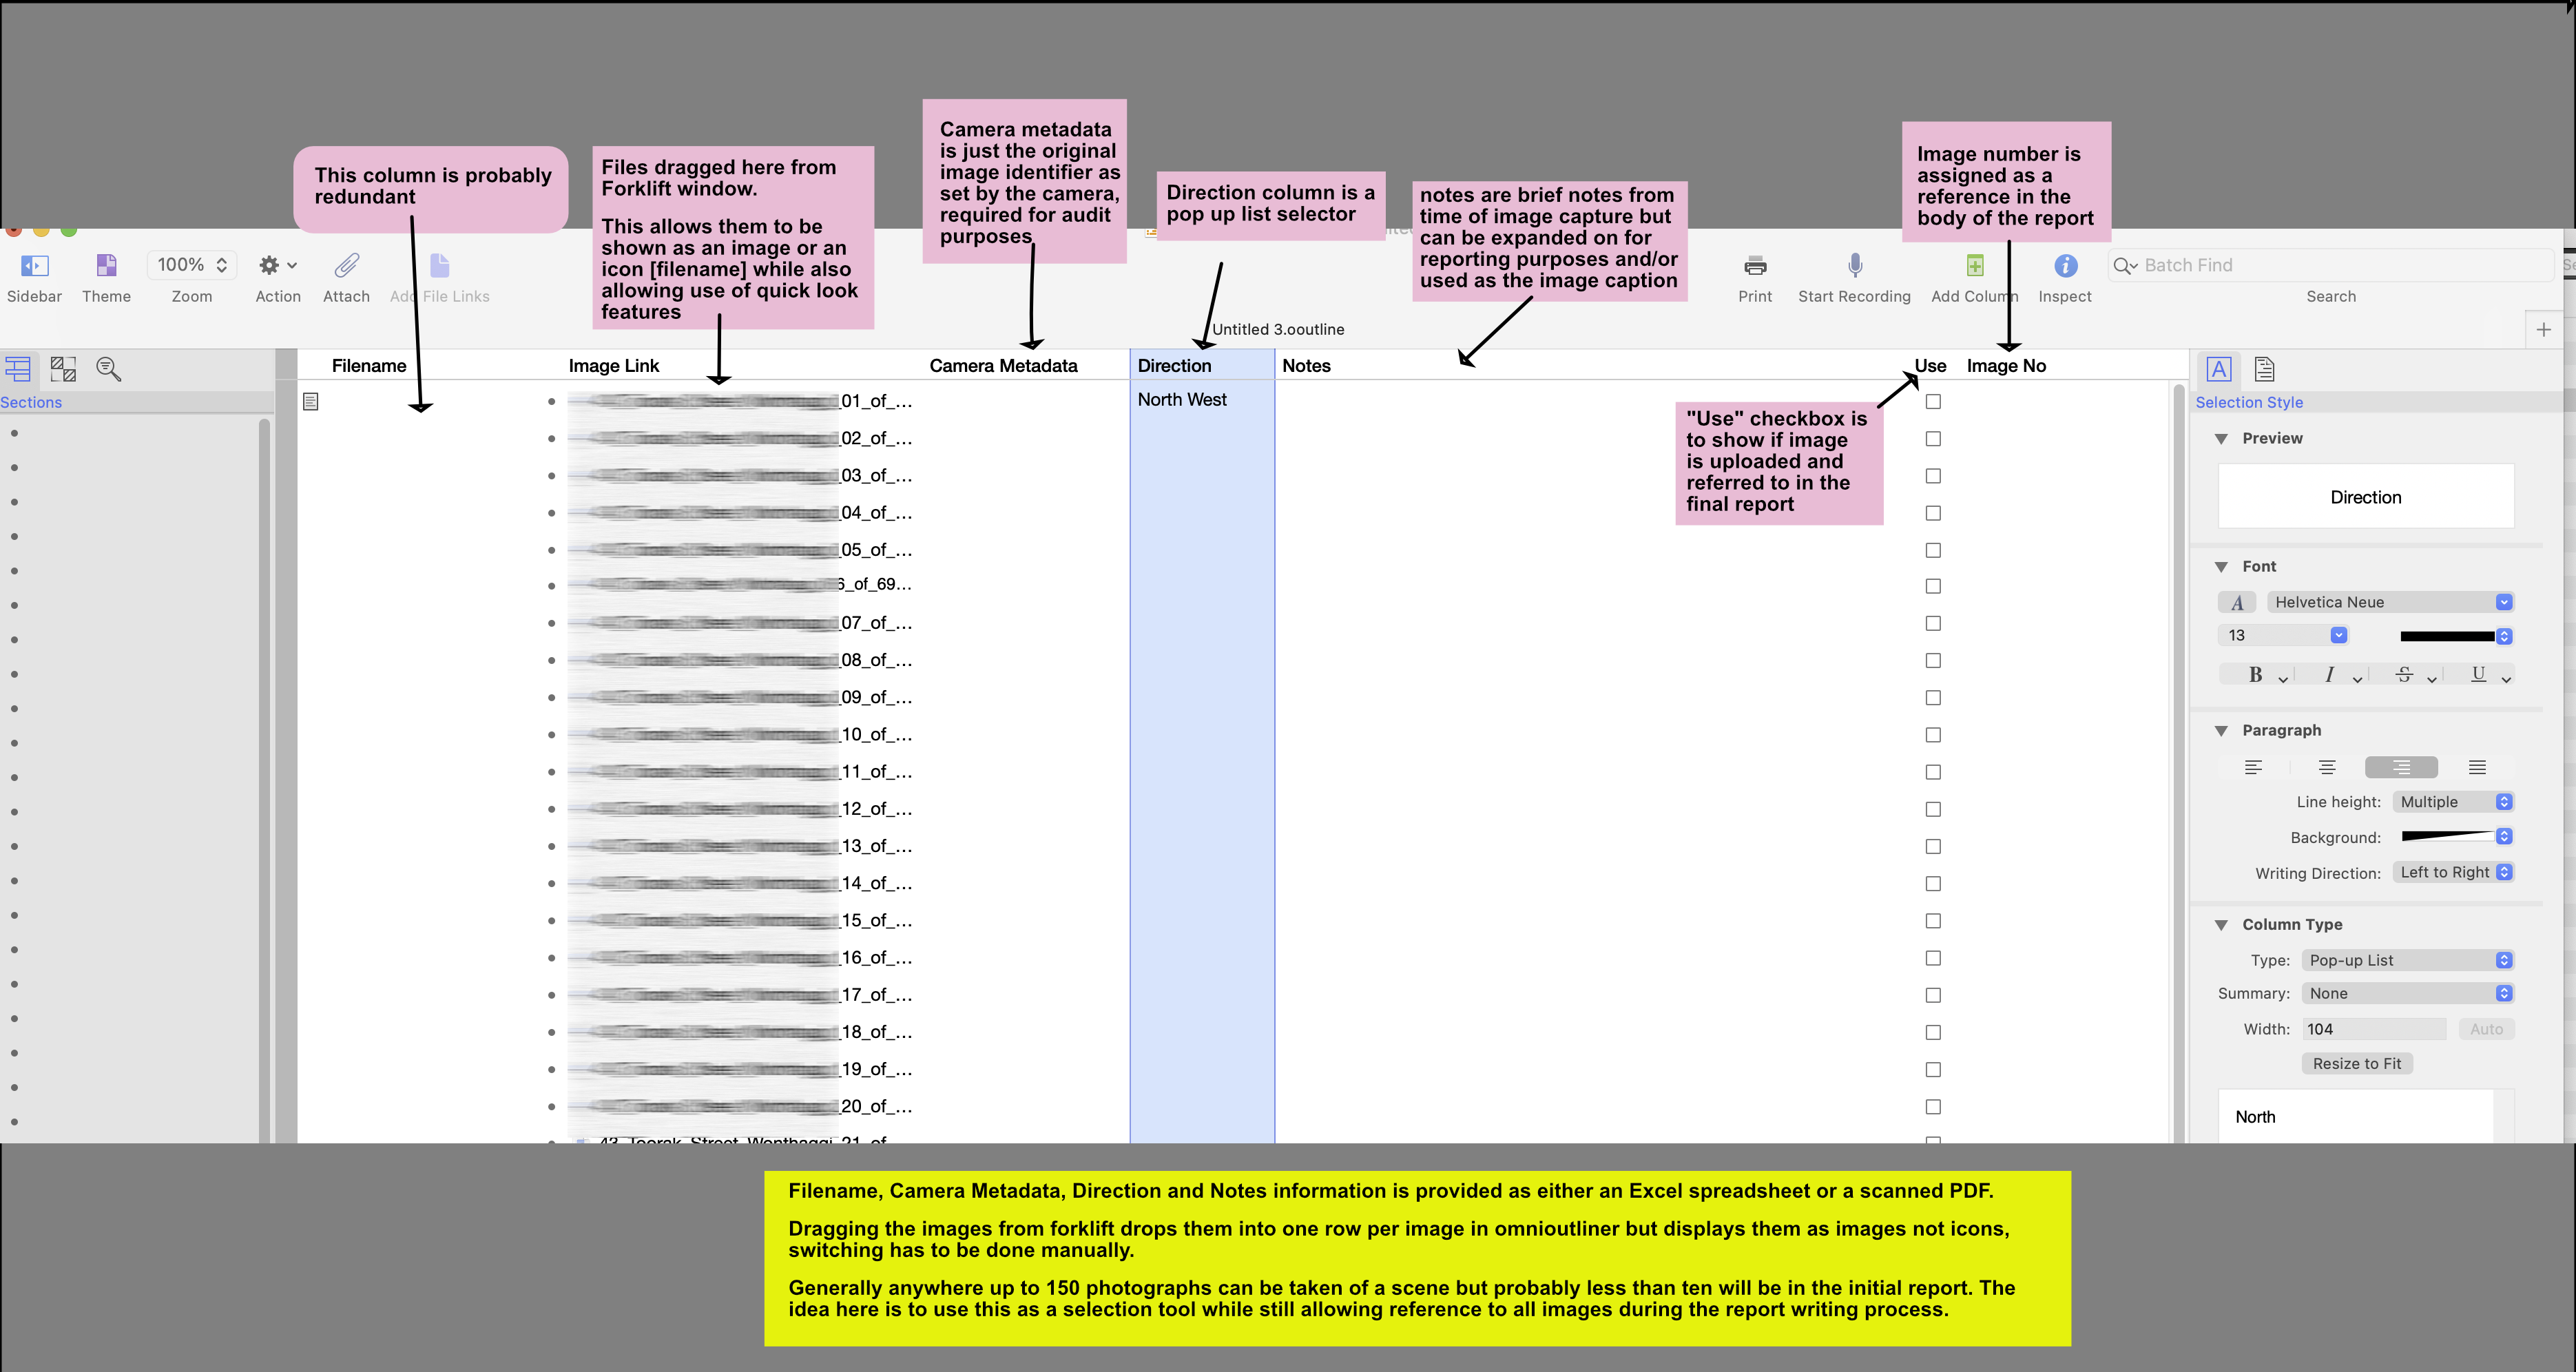
Hope this helps to explain the outcome, it is to be a working reference document throughout the report process as well as a final checklist for the images actually used.
Where are the actual images in your OO outline ?
The images appear in the “image link” column. When first dragged in they display as images but can be switched between icon+filename or full image display via the context menu. The screenshot shows them in (blurred) icon mode.
Generalising, the question: is there any way to import a sorted table of data into the sequential rows of an existing omnioutliner document?
If it cannot be done natively is there any combination of third-party apps that would enable it?
Import into a new OO doc and then paste the colomn of image links into thst doc? Or am I missing something.
Greetings. Intersting scenario. The Import Image Files plug-in demonstrates the import of images from a folder. It should be possible to expand the plug-in code to fill in other fields (cells/columns) and to create them as needed. Here’s a question: Is the metadata stored in a standard CSV or TSV file format that the Omni Automation script could read to poplulate the document? — SAL
It can be done using applescript.
This assumes that the data is in a CSV file that’s on the desktop named “imgc.csv” with six columns. The name and location are easy to modify or can be supplied when running the script. Or if the source file is an excel or numbers document, the script could be modified to work with that.
It will add a row at the top of the front OmniOutliner document for each row in the csv file. Note… your document shouldn’t be using the first column that way.
use scripting additions

set pdt to path to desktop as text
-- NB value for checkbox cells should be either 'checked' or 'unchecked'
set fn to "imgc.csv" -- work with CSV (comma-separated-values)
set cv to alias (pdt & fn as text)
-- create list of lines of csv file
set paraList to read cv as «class utf8» using delimiter "
"

-- convert comma-separated to tab-separated
set carl to {}
set tarl to {}
repeat with p in paraList
	set text item delimiters to ","
	set ci to text items of p -- split each line on commas, six items per row

	set text item delimiters to tab
	set ti to text items of ci -- re-join items using tabs
	set end of tarl to ti as text -- one tab-separated item per row
end repeat
set text item delimiters to ""

-- insert rows of data at top
tell application "OmniOutliner"
	set the clipboard to tarl as text -- put above data on clipboard
	tell document 1
		-- set column type of column 6 to checkbox
		set c11 to child 1 -- specify destination
		pbpaste at in front of c11 -- paste data above destination
	end tell
end tell
If you’re not familiar with applescript, you can create a script using the Script Editor application (inside the Utilities folder).
Let me know how much sense this makes (or doesn’t) and I can walk you through some of it. Also, you can email support using Help > Contact Omni for assistance. Maybe they can advise regarding the ‘view as icon’ issue.
Below is the sample data I used at different stages:
-- in original csv
"image link,camera metadata,direction,notes,use,image no
a123.jpg,File Size : 948 KiB,west,This might be a note,checked,1
b234.jpg,File Size : 888 KiB,south,Is a note,unchecked,2"

-- list of records
{"image link,camera metadata,direction,notes,use,image no
", "a123.jpg,File Size : 948 KiB,west,This might be a note,checked,1
", "b234.jpg,File Size : 888 KiB,south,Is a note,unchecked,2"}

-- list of records and fields
{{"image link", "camera metadata", "direction", "notes", "use", "image no
"}, {"a123.jpg", "File Size : 948 KiB", "west", "This might be a note", "checked", "1
"}, {"b234.jpg", "File Size : 888 KiB", "south", "Is a note", "unchecked", "2"}}
Here’s an example Voice Control command for OmnOutliner that imports spreadshhet data into an outline document. It demonstrates how spreadsheet data copied to the clipboard can be added to a document.
Thanks for the response, I will check that plug-in.
The metadata is usually in a standard excel spreadsheet and so can be saved our as either TSV or CSV; I got the impression that the tab-delimited version was needed to use with OmniOutliner.
Cheers, Michael
Thank you for the effort that you have taken with your reply, unfortunately I am a genuine novice with AppleScript.
I did construct some shell scripts that I needed to do some tasks, but that was towards the end of last century and so is just dim memory!
Still it is never too late to learn if I can locate some contemporary reference materials and use your information as a starting point.
Thanks again, Michael
Thank you for this information, I had seen a reference to this one but had glossed over due to the “voice control” in the title. Not sure if the words of frustration that I might use would be suitable input for voice commands.
I will have a closer look at it.
Michael
There’s a link of the Voice Control page labeled PLUG-IN FILE (iOS/iPadOS) for downloading the plug-in (or use this one in this message) The plug-in should work on all systems, even macOS. If the spreasheet data contain the file name of the image, I could adapt the plug-in to also prompt for the folder containing the images and then import the appropriate image for each row if you like. — SAL
Actually, I added the plug-in to the standard OmniOutliner plug-in page. Here’s a link to it: OmniOutliner Plug-In: Import Copied Spreadsheet Click the Install Plug-In button to install. For best results, start with a new blank outline.
The basics of using an applescript are as follows:
Inside the /Applications/Utilities folder, there should be an application called Script Editor. First copy the script I posted above using the ‘copy’ button that appears when the cursor hovers over the script (in the top right corner of the script pane).
- Launch Script Editor and then paste the copied script into an empty document
- To confirm that it is valid, click the ‘compile’ button; the fonts should change if this is successful
- Put a copy of the data (as a csv file) on the desktop with the name ‘imgc.csv’ (or change the reference in the script to match your reality
- Create a new omni outline
- In Script Editor, click the ‘run’ button
The contents of the csv file should look something like this. You could put this in a text file and save on the desktop with the name ‘imgc.csv’ to test with.
image link,camera metadata,direction,notes,use,image no
a123.jpg,File Size : 948 KiB,west,This might be a note,checked,1
b234.jpg,File Size : 888 KiB,south,Is a note,unchecked,2
After running the script, it will read the csv file and insert its contents into the outline document, adding columns as required. Right-click on the header of the column containing a ‘checked’ item (likely titled ‘column 4’ at this point) and from 'column type, choose ‘checkbox’. The items with ‘checked’ should now have a checkmark.
A lot of this can be customised, for example, the name or location of the file, whether it is a csv or an excel or numbers spreadsheet, or how you run the script. You may want to remove the headings line from the csv so that the headings are not treated as data.
Let me know if you have any questions or get any errors.
Thanks again. I am on the road for the next 24 hours and will let you know how I go on my return.
Thanks again. I will investigate ASAP.
Thanks Sal and Mockman, both of your different solutions go some way to solving the problem in different ways. Unfortunately they both simply enter the word “picture” into the element that should contain the image. Is it possible that this is an encoding problem since both are ultimately making use of text formats for data transfer while the images are in some other format? Or am I misunderstanding something else?
I may have caused some confusion myself by using the term “image link” as the column header when the column really contains the actual image. I had started off with the idea that there was some way to insert a link to the image file that would then be automatically loaded by OO but could not get this to work and so ended up just selecting all of the images in a folder and dragging them across to a new OO document. This created rows correctly with the. images embedded but I just stuck with my original naming convention.
Cheers, Michael
FWIW, I don’t think that there is a normal way to script the insertion of your images. (NB I say that without knowing the capabilities of the ‘automation’ that Sal proposes)
But, you could probably combine your current practice of dumping the images into the file with the table data and get what you want. By this I mean, do both actions and then move the text data to the cells around each image cell.
