So far I’ve only found how to add points to lines but how to add points to arbitrary shapes like a circle to to just points of the plane for that matter? by point I mean that without width or height
also does anyone know how to avoid the autoline up as your moving shapes around? (that thing where if you move shapes near a particular line it forces the shape to either be directly above or directly below said point?
If it is a particular line, try turning off Guides under the View Menu, choose Guide Lines. If that makes the line disappear, you know you were snapping to a guide.
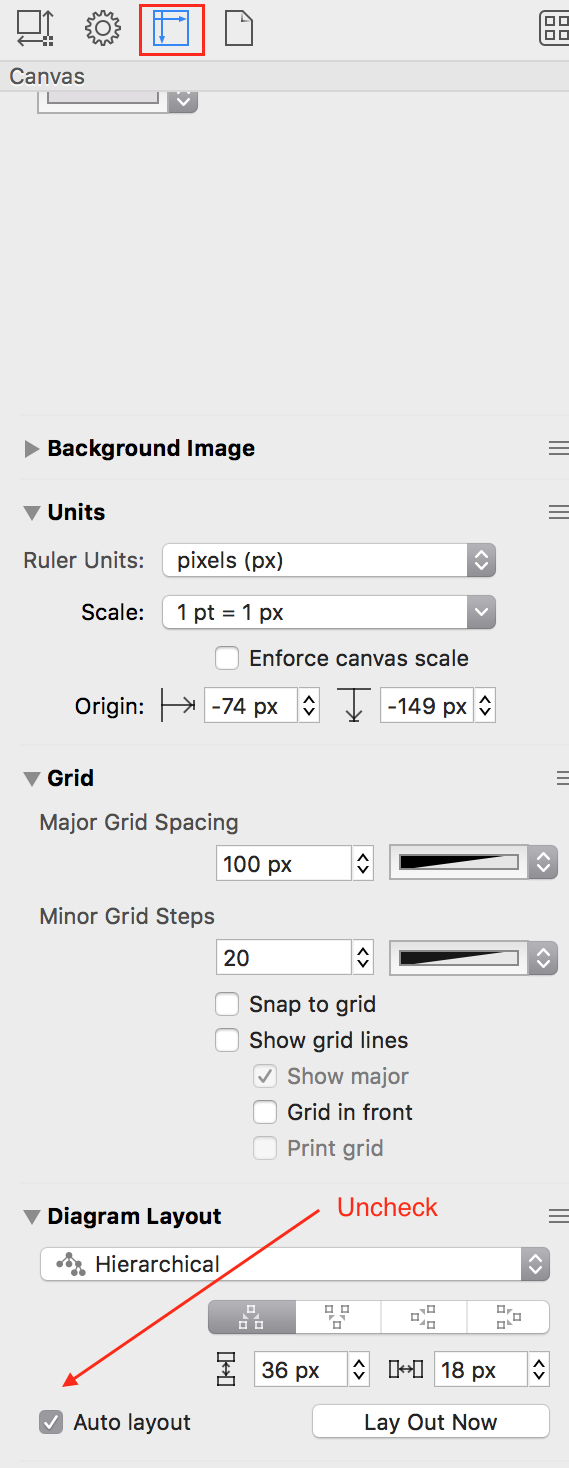
This can also happen if you have auto layout turned on in your template. If you go into the Canvas Inspector (On the right, looks like the photo below), and uncheck auto layout your shapes will stop aligning themselves if they are aligning based on a diagram setting.
If auto layout is already off, check the Grid area in the same inspector tab, and make sure Snap to Grid is off.
As far as adding points, do you mean that you want to add midpoints to a line? To do that, you can use Add Midpoint from the context menu (Control + Click).
If you want to manipulate points on a bezier shape, the point editor tool in OmniGraffle Pro is the best way. There is more information under “Altering Shapes with the Point Editor Tool” at https://support.omnigroup.com/documentation/omnigraffle/mac/7.0/en/using-the-tools/.
We are happy to help! Under the help menu, choose Contact Omni to send us an email.
Thanks,
Lanette
I mean specifically how do I add a point of no width or height to say a circle or just in the plane the purpose of which is to draw a line without displaying the endpoints of the line.
The autoline up comes up when you try to move a very small circle near the bottom of a large circle or other shape the small circle does not travel continuously but goes right from completely inside(or above) to completely below.
I am not sure I have correctly understood what you are trying to accomplish, but if you are trying to create a line, you may want to use the line tool. Choose the line tool and click once to start the line, click again for each midpoint, then double click to end the line. You can create a line with no stroke. If you just want a line to help you align other objects, you can drag out a guide from the ruler, which will show on canvas, but not print. If you already have a line, but don’t like the current line endings, you can change them by selecting the line, and going to the Object Inspector on the right. In the Object Inspector, you can set the line type, the start and end of the line, as well as all of the stroke options that determine how the line appears visually.
If you want to control where lines connect to the shape, use a magnet and not a point. Select the shape you are trying to connect and go into the Properties inspector, where you can use predefined sets of magnets which determine where the line should go. Otherwise, you can use the OmniGraffle Pro Magnet tool to position a custom magnet exactly where you would like a connection to attach. If you do not want your line to route through the center of the shape, you should set a magnet and turn off the “Route from object center” checkbox in properties.
Check out https://support.omnigroup.com/documentation/omnigraffle/mac/7.0/en/working-with-the-inspectors/ and search for The Properties Inspector. If you prefer, we also have a short video on Magnets at https://www.omnigroup.com/video/set/omnigraffle-7-for-mac/magnets/ which may be helpful.
If I have misunderstood what you are trying to accomplish, please feel free to contact support so that we can give some more specific advice. We are happy to help! Choose Contact Omni from the Help menu.
Do you have Snap to Grid turned on? (lanettetest mentioned turning it off.) The behavior you describe of a small circle near a big one will happen if the small circle’s diameter is close to the grid spacing and Snap to Grid is turned on.
