I’m new to Omnigraffle and trying to get over the learning curve.
I’d like to use this product primarily for AWS diagrams. There are a whole bunch of stencils where people have setup AWS simple icons (https://aws.amazon.com/architecture/icons/) out there but many are out of date or otherwise have issues. Found some on Graffletopia but seriously… I’m not paying money for diagramming software stencils.
So, my thought was to create a stencil using the EPS files available from Amazon. Here is where I get confused. I can drag and drop them on to a canvas, save the stencil and use them, however they show up as a mess in the first stencil window. (Hard to explain what I mean, when you open the stencils window three are three little icons, one is a bunch of overlapping squares, the second 4 aligned squares, and the third a group of horizontal lines. The first window shows as a mess so I want to align all of the EPS icons on the canvas in a neat group of columns and rows. I’m trying to use the “Align” menu but am just utterly confused. Is there an easy way to snap these objects into an evenly spaced “table” (like 5 columns across and multiple rows)?
Complete newbie with this software, any help would be appreciated.
I can’t understand that, I am not responding to that.
I can understand that, I am responding to that, only.
Yes.
First, you must use a Grid, and use it consistently, so that there is a Grid to Snap to, and spacing to Space to.
There is an Alignment Inspector tool, which works well for me (I don’t think I have ever used the Arrange/Align menu). It is visual and simple to use. And mostly intuitive. I say mostly, because the older releases of OG were more intuitive, the newer releases are counter-intuitive. These instructions and graphics are from OG 5.4.4. It took me all of five clicks to produce the stencil that I think you mean to produce.
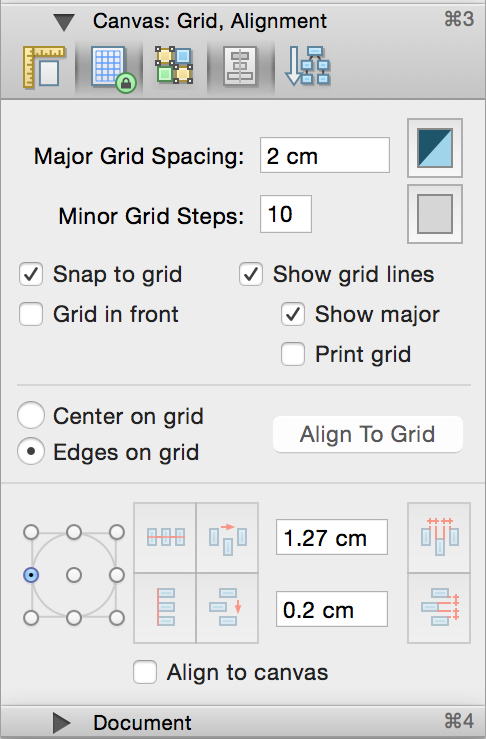
The Alignment Inspector is the fourth icon in the Canvas Inspector.
The first & second horizontal sections relate to the Grid (not to Alignment): you can note my Grid settings, but that is not relevant to our immediate purpose.
The third horizontal section relates to Alignment.
If you hover over an element in the Inspector, a balloon with a simple explanation of its function will be displayed. Those labels are given in italics.
Method
I selected an entire set of PNG icons from the Finder, then drag-dropped the selection directly onto the OG canvas. They appeared as expected, a bunch of shapes, one on top of the other, slightly staggered.
(the EPS icons are the same, but they have spacing, or pretend-alpha, bult-in, so they need more consideration; more work).
I Selected the bunch of objects.
I set the AlignmentRegister (circle-square thing with 9 selectable Alignment points “Point of alignment”) as shown, meaning, Align the left edges, at the object centres.
that caused the red lines in the next four buttons to be placed, showing precisely what will be aligned. The SW button is “AlignLeftEdges”.
Hit that. Boom, crash, opera, I now have all the objects in one mass, left-edge-alinged.
I entered 0.2 in the “Vertical spacing” window. That is the space I want, based on my Grid, between each object, when I distribute them.
The button next to that is “Offset vertically using the vertical spacing”
Hit that. Shebang and sheboom, the objects are now distributed vertically, evenly, with 0.2cm spacing in-between.
Some of the objects fell off the page, so I grabbed them and dragged them back in, forming a second column. Et cetera.
Save. Open the Stencil in the Stencil window (if you don’t already have it open). Looks good to me:
That was using the Vertical spacing capability only. Horizontal spacing only, works the same. Re your request, the tool is supposed to be able to perform both vertical and horizontal spacing on a bunch of objects at the same time (play with the other buttons in the Alignment Inspector). The results are completely out to lunch, not recognisable, bearing no relation to the settings in the Alignment Inspector. I have not figured out how it to make it work.
Vertical-only or Horizontal-only is good enough for me: in this instance, grabbing the off-page objects and dragging them onto the page, forming a second column, was no big deal.
Thanks so much for taking the time to respond with such a comprehensive answer!
I’m using v7.5 so things were a bit different in the UI but I was still able to follow this and get it working fine. I wasn’t aware that the EPS icons had built in so have switched to PNG as well.
Well, you will find out when you draw a real diagram.
The icons (both PNG and EPS) are very simple, and basic, with no depth to them, hardly enough to be elevates to a stencil. Eg. there are no magnets. The PNG/EPS choice depends on your purpose and how much labour you wish to devote to this project…
The PNG is the icon itself with no padding or margin, so the size of each icon is different. These icons are easier to add Magnets to, but harder to align on the canvas.
The EPS has one fleeting thought added: each icon is set into a pretend-alpha shape, 3.5278 cm x 3.5278 cm. Oh. That means easier alignment on canvas, but Magents must be manual (to reach the edge of the icon, rather the auto Magnets which would be the edge of the object … with a varying gap between the edge of the object and the edge of the icon). One small step in the direction of a Stencil, but not well thought out…
The AWS icons are good for drawing simple drawings for non-technical people. It looks good because the icons are cute and consistent, but it means nothing. Following each and every discussion, the diagram will have to be re-drawn.
For drawings that do not change (yes, they are added to, but what is extant need not be changed), you need symbols that comply with some Standard. And a real Stencil, with a lot of thought and experience poured into each symbol. Magnets in the right places, etc.
Notice, Amazon calls them “official” implying some sort of authority, but they do not suggest it is a Standard (which is an actual authority, a consortium, not a single vendor). They call it “Architecture”, but in reality, it is simple topology for cloud service providers, only.