Is there a way to make just one of the corners rounded on a square shape?
There’s Stencils/Common/Corners collection which should have what I need but it seems to be buggy (the corner style only works for shapes in the upper left part of the canvas –https://drive.google.com/file/d/0B56ak7W-HmqAMmlUcHdNbWd1Zkk/view?usp=sharing), so I’m looking for a work-around
Yes.
There are a few different ways, depending on the object; whether is is going to be grouped, etc. This is the simplest method, for a simple (ungrouped) object, a square. It is very easy to do, once you get to know OG, but the textual instructions are loooong.
Simple Method (1) • Low-Level Instructions
1. Foundation
Always use a Ruler and a Grid that is appropriate; SnapToGrid, etc. I am using 2cm major and 10 minor.
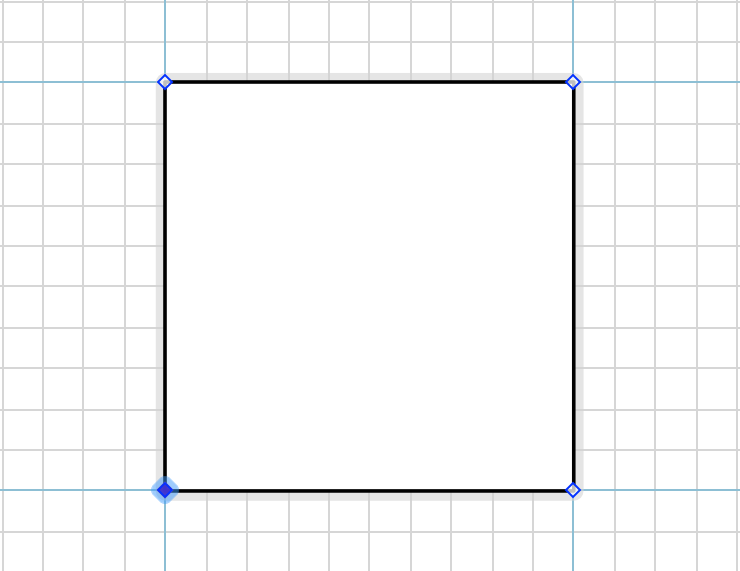
2. Draw the square or rectangle.
3. Select it, and EditMenu/Shapes/MakePointsEditable
4.. In addition to the usual square Handles that are visible when the object is selected,
- the object will now have small blue diamonds, which are EditPoints
- you need to get to know them, they are quite powerful
- the manual has very good descriptions and pictures, please read, I won’t try to repeat that here
- Each EditPoint has the capability for Bezier Handles
5. Because this is a square, there will be 4 EditPoints, one at each corner
- small problem: because it is a square, the Handles are at the corners; and the EditPoints are also at the corners, behind the Handles, therefore you cannot readily see them
- either double-click on an edge, which will cause a new EditPoint to be created (and the Handles will disappear)
- or Option-Command-click on one of the corners, which engages the EditPoint behind the Handle (and the Handles will disappear)
- now you are editing EditPoints (as opposed to handling the object via Handles)
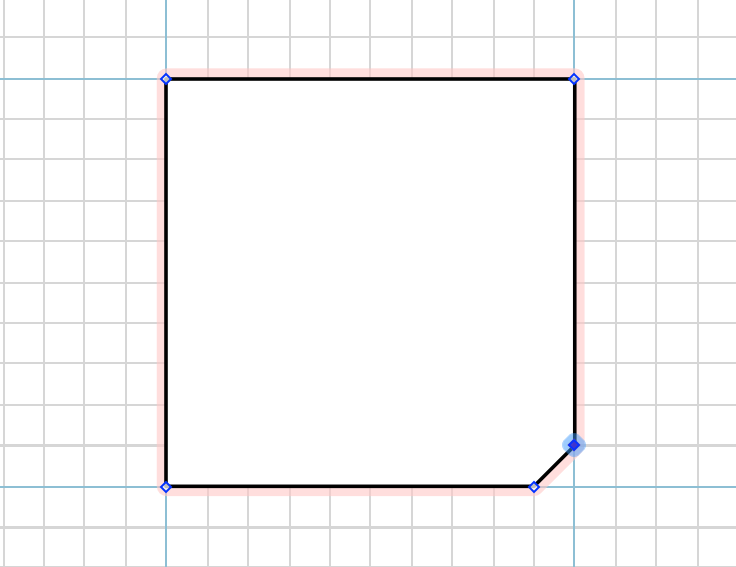
6. For a round corner, first, we need two points at the corner, rather than one.
- so double-click on the bottom edge, close to the bottom-right corner, to create the fifth EditPoint
- move that left, to one grid unit away from the corner
- move the corner EditPoint up, to one grid unit away from the corner
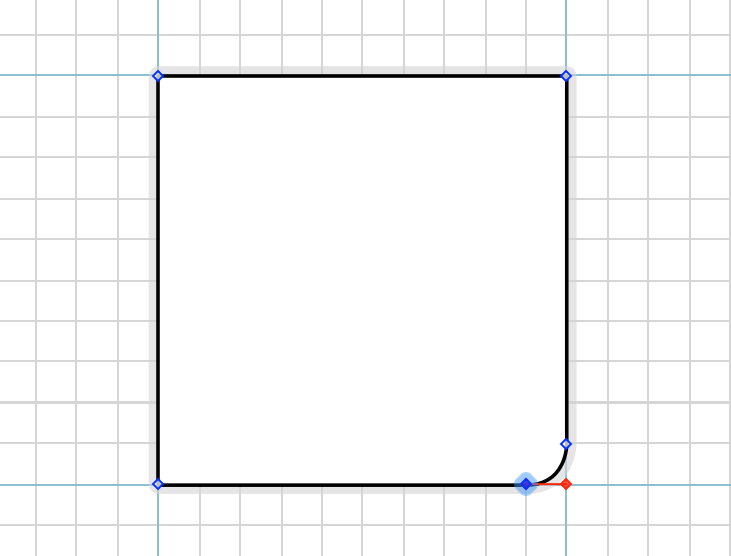
7. Second, we need a curve on that corner.
- We need Bezier Handles for that
- to obtain that, Command-click and EditPoint (say the bottom, right) and drag
- (that is the magic of the original OG team, the philistines who occupy it now have a different notion of software)
- each round red handle is a Bezier Handle.
- to start with, you get two, one for each edge leading out from the EditPoint
- if you drag one Bezier Handle, the other handle moves with it, maintaining the relation
- to drag one handle, use Option_click and then drag
- play around with the handles, to get a feel for them, and the effect it has on the edges going out of the EditPoint.
8. We need one, not two, Bezier Handles
- to remove it, grab one Bezier Handle
- and “put it back” in the EditPoint, it will disappear
9. Now for the curve, the round corner
- grab the remaining handle and move it
- such that it is one grid unit away, horizontally, from the the EditPoint
- the handle will be in the corner of the square (that we “erased”, above)
Enjoy.
Of course, you can play around with different configurations; grids; manipulating both Bezier Handles; etc. The above is just straight-forward and simple.
Well, it is the same as Wiki, any idiot can publish their stuff. The grade starts at pure horse manure, and increases slightly. It is good for people who think OG was invented yesterday, who are ignorant of its history. Full of bugs, just like OG 6.
If you want serious Stencils, that have been built up over the decades, try Graffletopia. All my published Stencils are there, free.
Thanks for the detailed reply!
One thing that annoys me about the result is that it’s not symmetric. IE, it looks a bit lopsided. You can verify this by doing a flip along the 45 degree line (horizontal flip + -90 degree rotation) or by following the same method on bottom vs top endpoints and then overlapping the shapes
However the rounded corner in “Corners” stencils under Common are perfectly symmetrical
If you are happy to look at XML, another avenue is to inspect the contents of the Rounded Corners.gstencil file, which may be on a path like:
~/Library/Containers/com.omnigroup.OmniGraffle6/Data/Library/Application\ Support/The\ Omni\ Group/OmniGraffle/Stencils/Common/Rounded\ Corners.gstencil
It’s zipped XML, and you could:
- make a copy of it somewhere
- change the file extension of the copy to
.zipso that you can easily unzip it - Open the unzipped text (xml) file in a text editor
(And then see if you can make enough sense of what you find to create an extra shape with the profile that you are after :-)
Not particularly quick or easy though …
(It would be a bit easier, incidentally, if you were to rename the expanded text file copy to give it the extension .plist, which would then enable you to view it in, for example, the Xcode plist editor)
Perhaps more rapidly,
Edit > Shapes > Union Shapes
See this old discussion:
You are welcome.
(EditPoints)
Well, it depends how much perfection you are looking for.
I don’t believe that people will be looking at diagrams at that magnification. Nevertheless, if you want perfection, you can certainly get it using OG 5 (not OG 6, but you can try).
When I said:
I meant you have to:
- a. get to know the tool
- b. specifically the EditPoints, and
- c. specifically the Bezier Handles, and
- d. get to know them by playing around and observing the effects.
That is the only way you will learn. Otherwise your ability with the tool will be very limited, and I am forced to give you …
Advanced Low Level Instructions
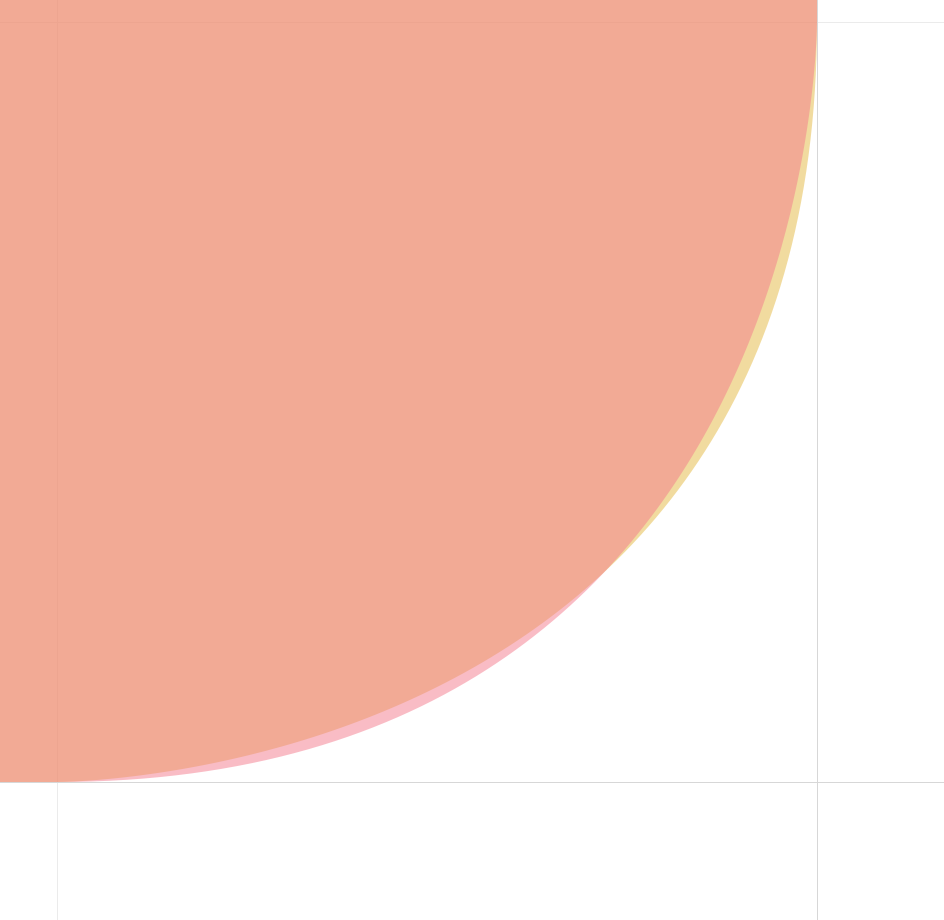
Ok, continuing from the previous set of low-level instructions. Now you have seen what one Bezier Handle on one EditPoints will do. It is good enough at most magnifications, but lopsided at very high magnification.
Well, you should look very carefully and notice that what we have told OG to do is lop-sided, and thus the result is lop-sided.
If you want a high resolution, non-lop-sided diagram, then we have to give OG the correct instructions. Eg. you need not one BezierHandle on one EditPoints, but one BezierHandle on two EditPoints that are symmetric, dragging the curve away from two EditPoints, equally.
10. Now for perfection of the curve
- Let’s give the EditPoints names (due to Omni Forum Bugs, it is impossible to match the diagram sizes to my previous post.):
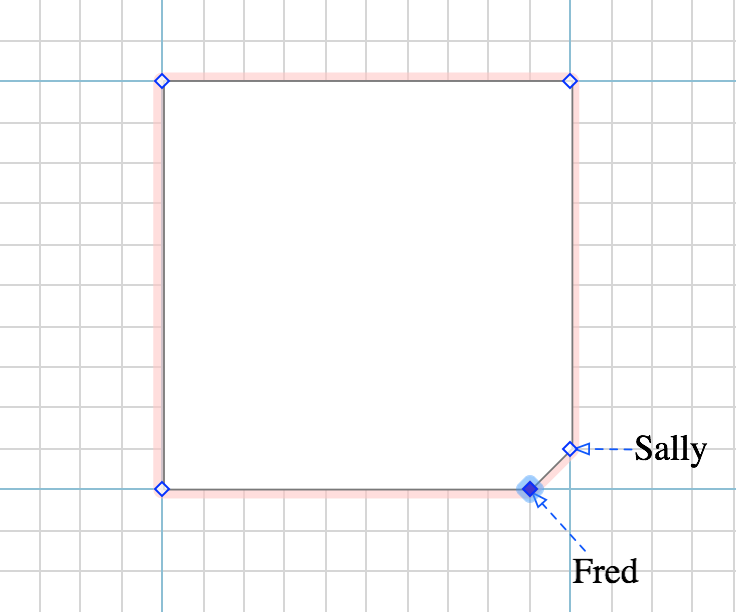
- select Fred, the EditPoints you worked with at [9]
- move it one grid unit left
- Select Sally, the next EditPoints
- move it one grid unit up
- the two EditPoints related to the curved corner, are each now two grid units away from the corner
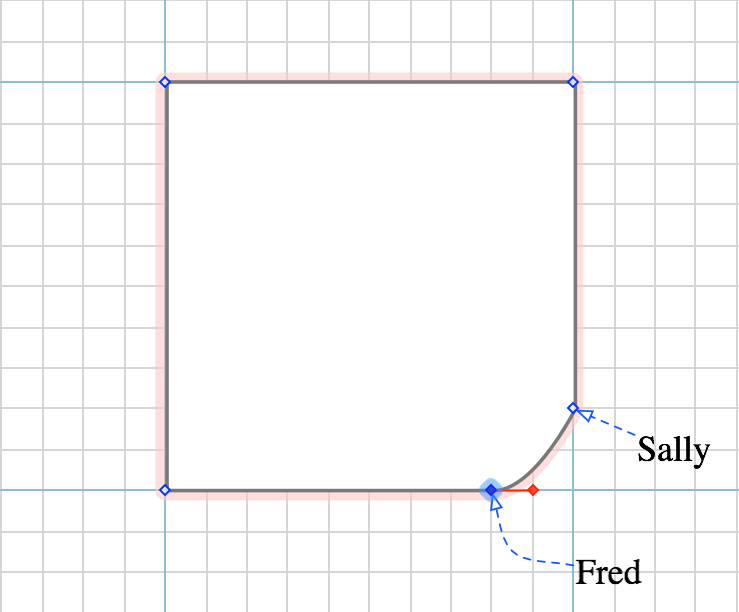
You should now have this:
-
since you have not played with the BezierHandles as instructed, at this point, at least notice the asymmetry of the curve
-
notice why that is so:
-
you have one BezierHandle on one side of the corner, but none on the other side of the corner
-
notice the result (in the diagram) of that specification
-
it is asymmetric
-
notice the cause
-
you have one BezierHandle on one side of the corner, but none on the other side of the corner
I strongly recommend that you:
-
copy that square
-
create more EditPoints and BezierHandles,
-
play; experiment; test; fold; spindle; mutilate, them
-
such that you get to know
-
a. the tool,
-
b. the EditPoints, and
-
c. the BezierHandles.
Otherwise you will be reduced to asking questions on some internet forum every time you need to use the tool.
11. Correction of Asymmetry
- select Sally
- obtain BezierHandles for Sally [7]
- delete one of Sally’s BezierHandles [8]
- move Sally’s remaining BezierHandle to one grid unit down from her
The purpose therein is to make Sally’s BezierHandles match Fred’s BezierHandles. It should look like this:
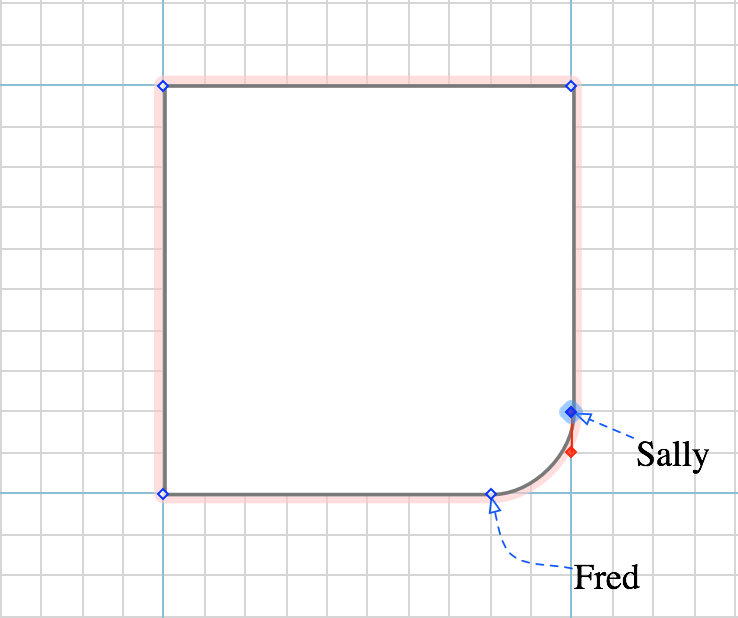
Now we have cornered symmetry at high magnification. Magnificat! My soul doth magnify the Lord.
I flipped it and flopped it and scrambled it, at 90º and at 45º, and I confirmed that the curve is symmetric. In OG 5. No idea what Tonka toys can or will do.
12. More Perfection
Now that was perfect enough for me. But it may not be perfect enough for you. I repeat:
-
you can get the perfection you desire, from the tool itself, with a very few clicks and drags
-
but you have to get to know and love:
-
a. the tool
-
b. the EditPoints, and
-
c. the BezierHandles
-
and the only way to do that is to play, play, play with them, and get to know the movements and results.
In order to avoid asking more low-level questions, that means, specifically, try the following:
-
move Fred and Sally (the EditPoints) each four grid units away from the desired corner
-
move Fred’s BezierHandles one grid unit away from Fred, and Sally’s BezierHandles one grid unit away from Sally. Notice the effect
-
move Fred’s BezierHandles two grid unit away from Fred, and Sally’s BezierHandles two grid unit away from Sally. Notice the effect
-
move Fred’s BezierHandles three grid unit away from Fred, and Sally’s BezierHandles three grid unit away from Sally. Notice the effect
-
move Fred and Sally’s BezierHandles (each) four grid units away from the desired corner, and one grid unit away from the centre of the square. Notice the effect
-
change the grid and the units, in order to obtain more fine resolution
-
repeat the above, using eight grid units between Fred/Sally and the corner
-
et cetera
If you still have not cornered perfection in OG, please feel free to post further.
Cheers
As I stated at the outset:
I have given you one simple method in my previous post (above). Again, there are many, simple, methods, within the tool itself, to achieve the result you want.
Alternate Simple Method (2)
Here I will give you a second simple method, one of the many, and noting your eye for perfection. If you don’t mind, I will not go into low-level instructions on this one,
-
Draw a square, with whatever properties you desire, and with both width and height 1cm larger than you need.
-
Use Inspector/Style/Stroke/CornerRadius and give it (eg) 10pt. This will give all four corners nice, even, symmetric curves. Round corners at 10pt. Feel free to experiment with different settings after this exercise.
-
Draw a rectangle, with the width 1cm greater than your square, and a height of 2cm.
-
Place it in front of your square (front meaning foreground, behind meaning background). Locate it so that it overlaps your square at the top, by 1cm.
-
Select both objects. Use EditMenu/Shapes/SubtractShapes. This will subtract the rectangle (in front) from the square (behind). Your square now has square corners on top, and round corners at the bottom.
-
Repeat [3][4][5], operating on the left side of your square. Your square now has three square corners, and one round corners at the bottom right.
As stated, it is really about getting to know your tool.
As stated, there are many, simple, methods, within the tool itself.
Deo grátias.
OK, I looked at the XML and it looks like this is achieved by adding extra “almost” overlapping Edit Points. It seems Omnigraffle treats multiple exactly overlapping edit points as a single edit point, so they get around by placing them at locations 0.5 and 0.49999999999999956.
This explains the weird “rounded corner disappears when I move shape.” The difference between 0.49999999999999956 and 0.5 is 8 ulps, so they are distinct float64 values. However, if I add 4 to both values, the difference becomes 0 ulps, so 4.49999999999999956 and 4.5 are represented as equivalent float64 numbers and the edit points get collapsed into 1. The work-around seems to be to move those coordinates to a larger separation. For instance, setting them to 0.5 and .49999999 means that I can shift them in either direction up to 100,000,000 without losing distinctness
1 Like
Sounds like you are getting to know the tool. It appears my instructions were not low-level enough for you.
It does not. They remain two separate EditPoints. The second one is “behind” the first, and therefore to access it, you have to move the second away, temporarily. If you select the “two” EditPoints, only the foremost one is selected.
I find it much better to never place EditPoints one on top of the other. But then, I can achieve everything I want from one EditPoint with two BezierHandles, rather than two EndPoints with one BezierHandle each, at the same coordinates.
That explains why the object moves inconsistently. In order for an object to move consistently, it has to be on the grid, that is, all EditPoints must be grid points. Try selecting an EditPoint and then Inspector/Canvas/Ruler/AlignToGrid.
If you want consistency (all aspects, movement being just one), you must use a grid, and stick to it.
So the issue with using Union Shapes, or by using Bezier handles, is that there was no longer CornerRadius control I can adjust. I have some regular rounded rectangles, and some rectangles with “3 rounded, 1 sharp” corners, and I wanted to have a uniformly way to adjust roundedness of both kinds of shapes after placing them.
However, it is possible to do by creating 2 edit points which are almost (but not exactly) overlapping at the corner which has to remain sharp. This way I can still use CornerRadius control to determine the sharpness of the remaining corners. I discovered this by looking at XML file of the “Rounded Corner” stencils.
This “almost overlapping but not exactly” seems to be required, if I overlap the two control points, the corner loses its sharpness as if there were only one control point there.
1 Like
No. The “almost overlapping but not exactly” simply engages the bug.
When two (or more) shapes are Unioned, the resulting shape has a few more EditPoints than is actually required. That is another (second) bug, or a fudge, which is by definition a bug. Correction of that bug will remove the superfluous EditPoints.
If you used a grid religiously, those minute differences would disappear. That is to say, you wouldn’t have the opportunity to engage the bug.
And if OG did not have these bugs, the EditPoints would not have that minute “almost overlapping but not exactly” difference.
Cheers
