Search for “Sidebar” and set the colors you want for all of those keys.
Save, import style, and set that new style in the color palette of your OmniFocus style preferences. We do not actually change the colors used until you select it in the dropdown menu.
Last but not least, sometimes the new color palettes show best if you quit and relaunch OmniFocus or at least close the old window and open a new one. We are trying to fix those last few cases where things aren’t applied perfectly, but just in case–that is a troubleshooting tip for you.
Good luck! I hope you end up with the set of colors that you want.
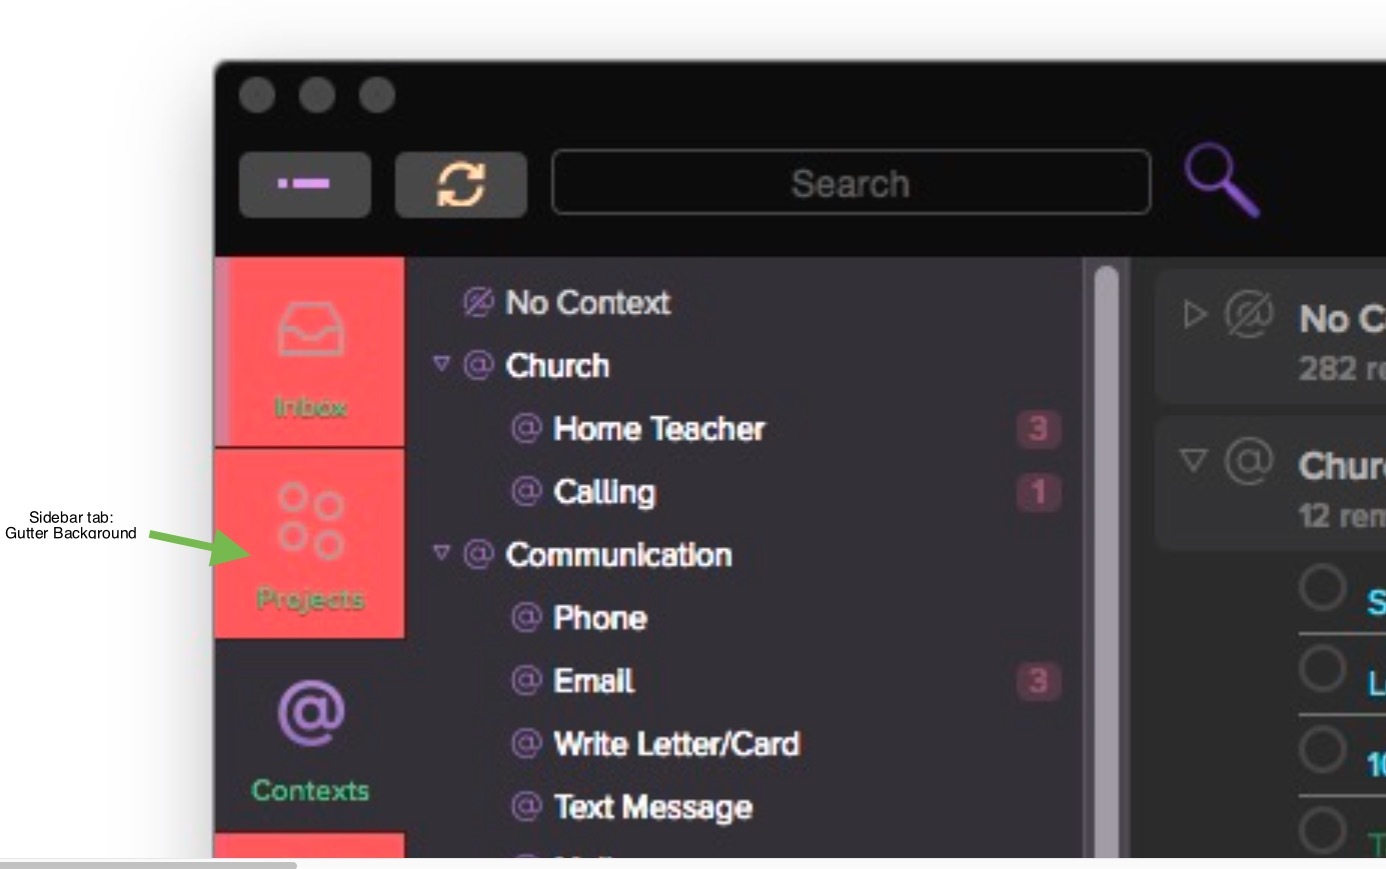
Conceptually, keep in mind that the set of colors isn’t just the background, but it also includes selection states, the borders, and the tints (opacity) that layer over the sidebar to build the final look. While this gives you a greater level of control in designing your color palette, the down side is that it takes more than just one key to change the overall look. For example, the Sidebar Tab: gutter background corresponds to all non-selected tabs. You still need for each view to set your selection, hover, and tints to get a complete look. Search for “sidebar” and I think you will get the set of keys to make the change you want. It is possible to change the color. You just have to set it for all of the applicable states.
I’m going to stick with “it’s not possible” until someone can prove it.
I changed every sidebar option, save, import, select theme, quit, and relaunch. Still shows as solid black. I’m simply trying to go from solid black to something less harsh like #828282. I’m not sure how changing the sidebar options would alter the toolbar and inspector, though.
You are right that changing the sidebar does not change the inspector. They are set separately. However, I did test changing the sidebar and got a garish purple effect to be certain it was in fact changing to the specified color. It is possible I am not understanding the exact areas you are trying to change, or that you are encountering a problem somewhere with your color changes? Can you change any colors and see the results? I’m glad to take a look if you want to circle the areas of a screenshot of OmniFocus that you are trying to change. Are you using the OmniFocusColors app, or hand editing the style document?
As long as we are trying to find which color in the UI corresponds to which line in OFColours, I’d like to add my question from another thread:
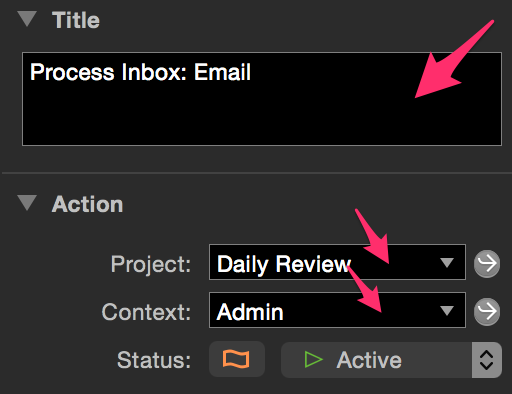
Is there a way to “action groups” the same color as “Available” actions (eg Black), while keeping status-based Blocked-context items and date-based deferred in a different color (eg Grey). How can I do that?
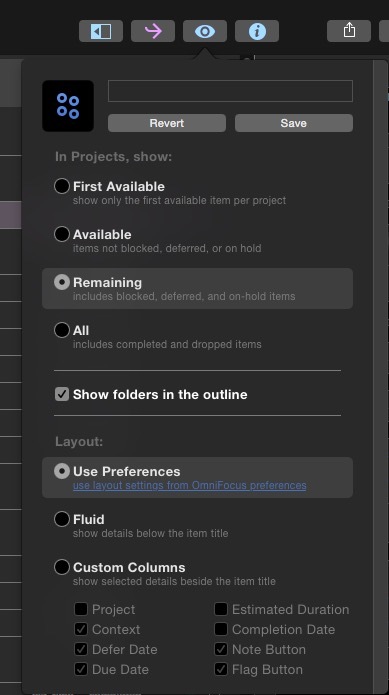
There is no way to change the background of the dropdown lists in the inspector, or the calendar widget in the inspector where you set the date currently. If you search for Inspector, we support changing only limited items. The 5 items listed there is the current extent of our support.
While you can’t change the toolbar background currently, you might try the customize toolbar options to see if you can find a look that matches your color palette better as a workaround. I put in a request for you requesting that the toolbar background be added as a key.
I actually just found it they are titled “Content: First Available”, “Content: Due Soon”, “Content:Overdue”, and “Content: Blocked”. I am so happy these are in there, it doesn’t seem to highlight the color of the background like it use to but hopefully I am just missing where that option is found though it seems it is not in there since there is no (Background) other “First Available” anywhere found in the search.
[Here][1] is a macro you can use with [Keyboard Maestro][2] to help make this testing process a little quicker.
In order for this to work properly you want to have manual imported the theme you are currently working with in OmniFocusColors once before running this macro.
Yes that is what is happening from what I can tell. “Content: Available” only works with Parallel projects to show you actions that are not the first in the list. Things changed with the behavior of how things were colored in OmniFocus 1. I think some of the changes I actually like better. A lot more to change that is for sure.
It would be nice if someone at Omni would make a document that showed how to access what was in the old vesion compared to the new.
Can anyone tell me what (Placeholder), (Normal), (Hovered), (Pressed) and (Strong) mean. The names seem logical enough and having worked with HTML a bit seems like mouse or selected states but they don’t seem to change anything for me regardless if an action is selected, mouse is over it or if is hovered. I have changed them to different colors and nothing changes.
Hi! The metadata text applies to the labels that describe the action items. More of them show when you are viewing columns than when you are viewing using “fluid”.
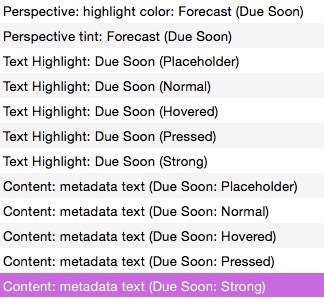
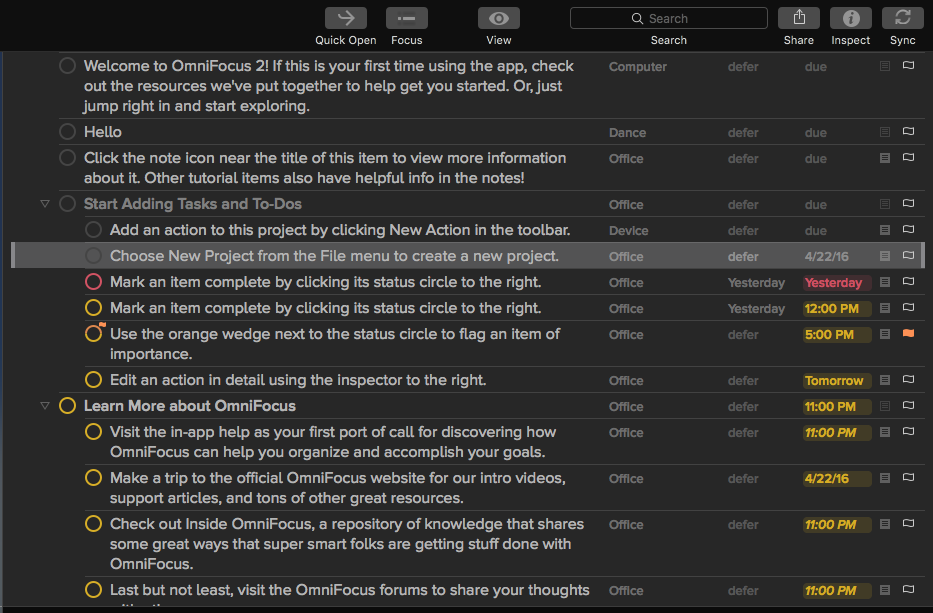
Office in the selected row shows the Content: metadata text (Placeholder) combined with the Content: metadata text (Hovered) because my cursor was over it.
Yesterday shows the Content: metadata text (Overdue: Normal) state as 11:00PM shows the Content: metadata text (Due Soon: Normal). To see Content: metadata text (Due Soon: Placeholder), go to where you’ve set the date and delete what is in there. While you are editing, the placeholder color shows.
In the default Color Palettes, we don’t use different colors for every setting. This is partly because it is a bit jarring if the colors are too different as you edit, but we did want to provide the ability to set them for those who wish to customize. Those using your custom style will see them or not depending on the preferences they use for the view settings in Layout Preferences.
Strong shows up when you check “Show folders in the Outline” and it controls the text based on the status of the project or for the normal “Strong text color” that is what is used for folders. Also, when you are editing the text itself, the “Strong” color for the status applied is used. Try this with projects, action groups, and action items to see how it impacts the color. That question was so tricky I had to experiment and ask around, so thank you for a great question.
This is great, I will need to find an hour or so to experiment around, the picture certainly helped thanks a bunch! I wonder if OmniGroup might provide a 5 or 10 page PDF with circled numbers corresponding to all the options. It would be so nice to just look at the place where you want to change and see a number with a circle and find the corresponding value(s).
I certainly love the new options and surprisingly have found things for the most part to now be even easier to find/differentiate in OmniFocus 2. Thanks for the wonderful update and work!
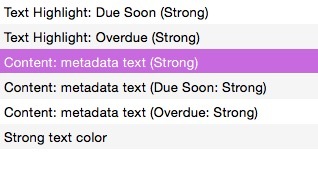
“Content: metadata text (Placeholder)”
Changes Defer, due, est. time and completed column and empty content location. This is great that all these options are there but it feel like pure guess work. So glad that the app is made no doubt, I just hope Omnigroup doesn’t stop there.
“Perspective Tint: Projects” is what changes the folder colors for me.
Content: metadata text (Strong) I noticed changed the text of the folders changed with this. Thanks for telling me about “Show folders in the outline” I didn’t have that checked.
I agree with you that the other (Strong) items do not appear to be used in the way I’d expect. The issue has been reported. Sorry for the trouble with Strong. If I learn something new, I’ll share here.
While we released an annotated version of the style file for our Font Collection, there currently isn’t a companion item for Color Palettes. It has been requested. I know that the keys are named logically for how OmniFocus uses them, but for those of us who are trying to puzzle it out visually, it can take some time to translate through trial and error, so I agree with you that it would be a nice reference. Thank you for explaining in so much detail what you are trying to do!
Here’s a link to a PDF with our test team’s notes on each of the color settings. Many of the entries have before and after screenshots so you can see what they affect: